Canopy Tent Design Tips
A canopy tent's size makes it great for drawing attention at events and getting your brand out there. But its size can also make creating a hi-res design a little difficult.
We've gathered some topics that explain the technical side of designing for print and will help ensure your design will look its best when printed. If you have any more questions, feel free to contact our support squad and they will reach out right away.
- Vector vs. Raster images.
- Low image resolution.
- Checking Image Quality.
- Getting images suitable for printing.
- Downloadable templates.
Vector vs. Raster images:
Vector and raster files are the two most popular image formats used in design. Though they may look similar, there are important differences between the two. Understanding these differences can help make sure you're using the best art for your printing needs.

Examples of vector and raster art zoomed in for detail. The image on the left shows a close-up portion of a piece of vector art with anchor points and lines. The image on the right shows a close-up of a raster image made up of individual pixels. Notice how fuzzy the raster image is when comparing it to the vector image while enlarged.
Vector Images use mathematical equations combined with fixed points and curves to create a crisp looking image. Because there are no individual pixels making up the image, you're able to scale it infinitely without affecting the image quality. This is useful for images that are shown at a variety of sizes across multiple products and media, like logos. An easy way to tell if you have a vector image is to zoom in on an edge with contrasting colors. If the edge stays crisp, you're most likely looking at a vector image.
Raster Images use a mosaic of tiny colored squares stacked next to one another. If you were to start enlarging a photograph, you'd see these squares getting larger and larger. A raster image's wide range of color and light make it ideal for editing and manipulating. All photographs are raster images along with most images you see online. An easy way to tell if you have a raster image is to zoom in on an edge with contrasting colors. If the edge starts to turn into individual blocks of color, you're looking at a raster image.
Vector File Formats |
|
Raster File Formats |
|
*Most PDFs are vector files but it depends on what program is used to create it.
Low image resolution:
The number of dots in every inch of an image determines its resolution. The printing industry refers to this as DPI, or Dots Per Inch. When we warn that an image has a low DPI, we're saying that the image doesn't have enough dots in it to look smooth after printing. An image may look great on your phone or computer monitor but that's because you're looking at a much smaller version. Once that image prints at its actual size, it can look drastically different.

A close-up comparison of a photo printing 10 feet wide at 6 DPI and 200 DPI. The ruler shows how large individual dots appear to the naked eye when printed.
300 DPI is the ideal image resolution for printing but our custom canopy tents and accessories can be printed with images that are only 200 DPI. Social media and most websites store raster images at 72 DPI, which is not ideal for printing. This is especially true if you're wanting to print your photo on a 10 foot wide canopy tent. When you take a 4" x 6" raster image or photograph that's 72 DPI and enlarge it to be 10 feet wide, the image resolution gets lower because the individual dots making up the image are getting larger and there are less of them fitting in every inch.
Checking Image Quality:
The design tool recognizes when you upload a raster image and will notify you if the DPI may result in a poor-quality print. If an image's DPI is below our ideal resolution, a warning will appear next to the image alerting you to a potential problem. 
Three possible symbols for image resolution validation in the design tool: Bad, Caution, and Approved. The design tool will re-evaluate DPI as you scale an image up or down.
A yellow "Caution" warning will appear next to the image if the resolution is below ideal and has the potential of being noticeably pixelated when printed. 200 DPI is the ideal image resolution for our custom canopy tents and accessories while 300 DPI is ideal for all other products.
A red "Bad" warning will appear next to your image when the resolution is very low and has a high risk of resulting in a poor-quality print.
As you scale an image up or down, the design tool will calculate the DPI and display it in a meter next to the image. Once a raster image has a high enough DPI, a green "Approved" notification will appear signaling that the image resolution is high enough for printing.
Getting images suitable for printing:
There are a variety of ways to get an image with a high enough resolution suitable for printing. Some stock photo websites will offer a range of image quality to download. If given the choice, the highest quality image should be downloaded.
There are many free to use websites that offer image upscaling services. These websites use AI technology to create more dots in an image so that it will have a higher resolution at larger dimensions when printed. Because AI is creating portions of the image, results can vary from image to image depending on a range of factors. We recommend testing your image on multiple websites to find which is the best fit for you.
If a designer created your image, you could try reaching out to them. Chances are, they may be able to provide you with a higher quality image.
Downloadable templates:
Want to design your custom canopy tent or accessory in another program? We've got you covered. See our templates page where we've gathered all of our canopy tent and accessory templates in one spot.
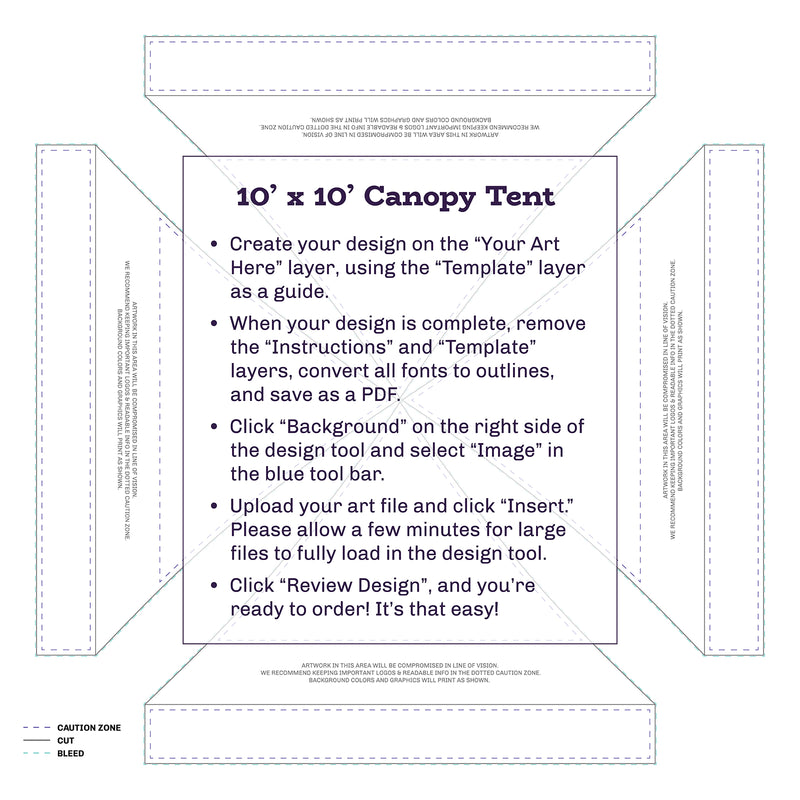
An example of a downloadable template with instructions on how to properly set up artwork in it.
Select your size and download the corresponding PDF template. Open the template in a graphics editing software, like Adobe Illustrator or CorelDRAW, and follow the instructions. If instructions are followed properly, your art will line up correctly in the design tool and will not have any image resolution warnings.